Render Something
You have a variety of ways to render something to the screen. Let's explore our options.
Color Render
The simplest way to see something, as quickly as possible, is to give it the ColorRender component, which renders a rectangle of the entity's color to the screen. If you don't specify a color, it'll be white.
let color_render = &ColorRender{
    size: Vec2::splat(100.), // This gets further multiplied by the Transform's scale!
    visible: true,
};
So now if we want to see an orange square player, we can add this in and finally see something in our game.
💡 The ColorRender component gets its color from the entity's Color component.
use engine::prelude::*;
mod ffi;

#[system_once]
fn spawn_player() {

    let transform = &Transform{
        layer: 10.,
        ..Default::default()
    };

    let color = &Color::ORANGE;

    let color_render = &ColorRender{
    size: Vec2::splat(100.),
    visible: true,
    };

    Engine::spawn(bundle!(transform, color, color_render));
}
If everything goes to plan and you call this function, you get a nice orange square! Hurray, you made a player!

What if you want something more complex than a rectangle? Well, that's too bad.
Texture Render
Unless, of course, you use a TextureRender component instead. Note that in order to use this, you'll need to load a texture into a GPU Interface, which we'll cover in more detail down the line. In the meantime, if you have an "assets" folder in the root of your project, you can load a texture like so.
let texture_render = &TextureRender{
        texture_id: Some(gpu_interface.load_texture("doge_baker.png").into()), // The texture to use.
        uv_region: Rect::new(0.0, 0.0, 1.0, 1.0), // What UV Region of the texture to use.
        size_override: None, // As above, multiplies by transform scale
        visible: true,
}
If we take this image and place it in an assets folder in the directory's root, and transform our lib.rs as follows...

use engine::prelude::*;
mod ffi;

#[system_once]
fn spawn_player(mut gpu_interface: Mut<GpuInterface>) {

    let transform = &Transform {
        layer: 10.,
        scale: Vec2::splat(3.0), // It's a small image so I really want to see it.
        ..Default::default()
    };

    let color = &Color::ORANGE;

    let texture_render = &TextureRender {
        texture_id: Some(gpu_interface.load_texture("doge_baker.png").into()), // The texture to use.
        ..Default::default()
    };
    Engine::spawn(bundle!(transform, color, texture_render));
}
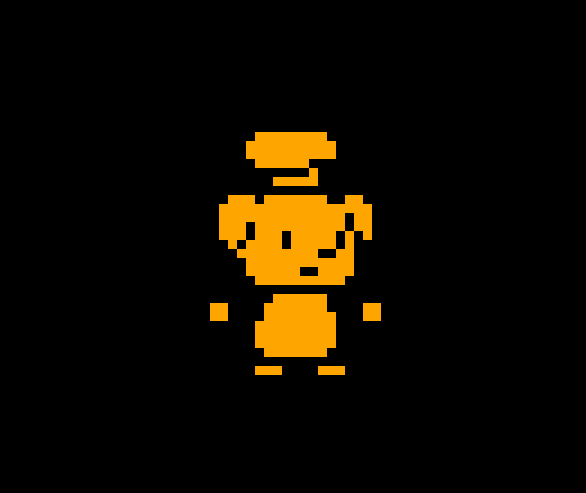
💡 Notice that the color we declared before is still getting applied! While our base image was just white, making this effect not that interesting, combining a Color component and a TextureRender component makes it easy to tint your sprites different colors.
Circle Render
The last basic type of rendering is the CircleRender component, which is a bit of a misnomer - it's a regular polygon render. In fact, if you want an orange square again, you can do this
use engine::prelude::*;
mod ffi;

#[system_once]
fn spawn_player() {

    let transform = &Transform{
        layer: 10.,
        scale: Vec2::splat(3.0),
        ..Default::default()
    };

    let color = &Color::ORANGE;

    let square_circle_render = &CircleRender {
        num_sides: 4,
        ..Default::default()
    };


    Engine::spawn(bundle!(transform, color, square_circle_render));
}
Voila, a square circle:
You can of course, make a triangle with three sides, or increase the number of sides high enough that it actually looks like a circle, or prevent anything from rendering at all by setting it to 2 or less sides!
What good is having an entity in the game if they can't move though? Well we're gonna have to learn about queries if we want to do that.